
While it is tempting to ask your pixel-savvy colleagues for help once in a while, this article will help you act like the grown up professional you are and use Google Tag Manager (GMT) to install everything yourself.
Benefits of Google Tag Manager
- GTM lets you check whether your measurement systems are ready to go.
- It helps you install everything yourself (read: without the IT department).
- When implementing a pixel through GMT you can make changes without diving into website code.
- The debug mode allows you to view and test drive changes in real time before publishing them.
- You can connect measurements from other advertising channels with the help of GMT.
- You can create different levels of account access, differentiating between employees and stakeholders, picking between editing or preview modes.
HOW-TO GUIDE
To find your way around Google Tag Manager, lets get a few basic concepts down.
- Tag – Or brand, refers to Facebook Pixel code.
- Rule (Trigger) – Represents a condition that triggers the tag. In our case it will be the occurrence of any of the events connected to your pixel.
- Variable (Macro) – a particular value that GTM sends to Facebook.
Apply the basic code pixel
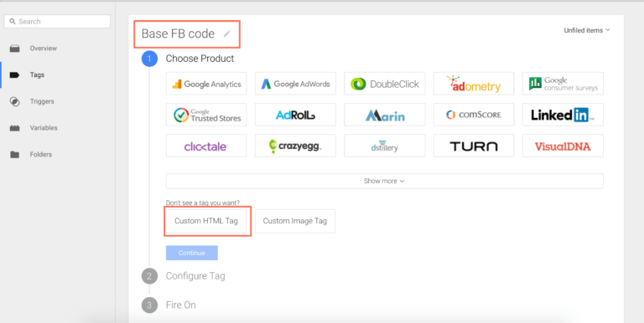
You should start by inserting the basic pixel code to integrate the advertising account.
![]()
After logging in, open a GTM bookmark tags. Click Create New Tag and set the name. Since GTM doesn’t have a template for pasting the basic Facebook Pixel code, you should use Custom HTML Tag instead.
Code copy and paste
The second step is to insert the code itself. Just copy a Facebook pixel code from your account, and paste it into a text box. Then select the pixel you want to use when the page is loaded. Basic PageView event will then be placed on all pages of the site. The third step is to select All Pages and create a tag.
![]()
Debugging heaven
One of the advantages GTM is its so-called ‘debug mode’. It allows you to preview any changes you make before publishing them on your website. Click to enter debug mode in the upper-right corner, click Publish and select Preview and Debug from the options tab. When you visit your website next the debug mode will run automatically.

Preview mode allows you to see tags for load and launch and the information that goes onto your advertising account, including statistics.

If you like what you see in the preview mode, you can return to GTM, disable debug mode and publish your changes. Make sure the pixel is installed and functioning properly via Pixel Helper(Google Chrome Extensions).
Basic Facebook pixels can create audiences from your site traffic and lookalike audiences but can’t track value and number of transactions or create Dynamic Ads.
Deploy and conquer
To find out the number of conversions from your ads, supplement the pixel with events. After loading a page or clicking a user starts an event, sending corresponding data to Facebook accounts.
For every event you will have to create a variable and a rule. Most frequently used events are ViewContent, Add to Cart and Purchase. In this article we will discuss how to implement those.
a) Set up a dynamic variable (variability)
To make sure the DSA code is performing properly, inscribe dynamic pixel variables. The variables are the values that GTM will send to your advertising account. Dynamic variables may be the product ID, product name, order value or other elements.
Order value is also a dynamically changing variable. To make sure it is working correctly, set transactionTotal or other variable from your data layer that you are looking to measure. To set the data link, pick the tab Data Layer in the debug mode after creating a test order.

Choose the tab GTM Variables from the menu and in the lower half of the page click New. Select Data Layer Variable from the menu. In the blank field Data Layer Variable Name enter a name for the dynamic value you want to monitor, exactly as programmed in the data layer – in our case transactionTotal .This creates a variable.
Look at the list of variables that are required for individual events to work properly with DPA.

You can create other variables following the same procedure and paste them into the pixel.
b) Setting rules (Triggers)
A rule is a trigger tag, that gives instructions as to when and how to send data to the advertising account. Rules are set as the last step of tag creation. In case if you are setting the basic body of a pixel (PageView) select All Pages. For other events, rules must be set separately to prevent monitoring all events on all pages at once.

Read on for detailed instructions of setting rules for specific events.
ViewContent
ViewContent or “View content” is an event that is usually placed on specific e-shop product pages.With dynamic ads ViewContent can be used to re-market to users that have already viewed particular products with special creatives or offers.
To set this tag insert a piece of code and the corresponding dynamic variables, as shown below. Choose style load Once per Page and link that event with a basic body of a pixel as follows: Tag Sequencing – Fire before Tag Product Page – Facebook Pixel Fires and choose the tag from the menu. This step should be carried out for every individual event separately, or else GMT will unite it with your pixel.
Variables required for this event are and .

Setting rules for ViewContent
Create a rule by clicking More and New.


From events select Custom Event. GTM will require the name of the event. Run the debug mode, select the tab Variables and copy the name of the event fireRemarketingTag. Copy to setting rules on GTM and click Save.

Addtocart
Event addtocart (adding a product to basket) is particularly useful for dynamic ads, allowing you to target users who have added products to basket but did not complete the transaction.
Set the tab Variables and check all fields in the table Clicks.

Setting rules for addtocart
GTM needs this event to create a new rule to run the tag and send the relevant information to the advertising account. This event runs when the user clicks Add to cart .
Select Triggers from menu, select Click as the event. In the following paragraph select All Elements. If you want to run the rule only if the button redirects to another URL, select Just Links. Select All Clicks as the last step.

This gave GTM instructions to record any event activation carried out on the site. Since the event you want to run is Add to Cart, to add it, open then debug mode.
Here you can observe clicks that run gtm.click. In the tab Variables value Click Classes varies depending on where you click. Click on the Add to Cart option and open the variable crank in a debug mode.

Re-open the rule settings and change the last point All Clicks to Some Clicks. Then choose a variable Click Classes and copy the exact wording of the variable from the debug mode.

The last point is to set an event for creating a tag. Open then the appropriate tab the same way you did for ViewContent and paste that portion of the pixel.
![]()
Select More from the menu and choose a rule that you have set in the previous steps.
Purchase
Create a variable for an event Purchase following the same steps. As in previous cases, copy the relevant part of the pixel to the advertising account.
![]()
According to default Facebook settings the Purchase event uses dollars as a currency. Setting the pixel will allow you to change currencies depending on your markets. If you want to work with a dynamic value of the order, change zeros for variable transactionTotal as follows:
FBQ (‘track’, ‘Purchase’, {value: transactionTotal ‘currency,’ CZK ‘});
Setting rules for Purchase
A transaction will attributed when a user lands on the last page of the ‘add to basket’ purchase process. For that you need to re-define the rule Custom Event.
Go to your website, make a test order and start debug mode. In the tab Variables copy the exact wording of the event trackTrans.

Publish changes and verify their accuracy in debug mode. The value in the red box should sit with the value of the order.

You can also verify the correct positioning using the Pixel Helper.
![]()
Ready to deploy your DPAs? Start our Free Trial today and get all the pixel installation help you might or might not admit you still need.